Building Plans for a Picnic Table
Easy-to-Build with Step-by-Step Instructions
© freewoodworking.ca
Visit freewoodworking.ca for more DIY projects.
Disclaimer
Every attempt has been made to provide the most accurate information possible. However, the publisher accepts no liability for any incorrect information as a result of purchasing and/or reading this guide. Follow this guide at your own risk. The publisher accepts no responsibility for any injury.
Copyright © freewoodworking.ca
All rights reserved.
Creating your own picnic table is a rewarding project that combines functionality with personal craftsmanship. Not only does it provide a dedicated space for outdoor gatherings, but it also offers several advantages over purchasing a pre-made table.
Benefits of Building Your Own Picnic Table
- Cost-Effective: Constructing your own table can be more affordable than buying one, especially when using cost-effective materials.
- Customization: Building it yourself allows for customization in size, design, and finish to perfectly match your outdoor space.
- Skill Development: Engaging in this project enhances your woodworking skills and provides a sense of accomplishment
Beginner-Friendly Tips
For those new to woodworking, here are some simple tips to ensure a successful build:
- Select the Right Wood: Choose durable, weather-resistant wood like cedar or pressure-treated lumber to withstand outdoor elements.
- Accurate Measurements: Double-check all measurements before cutting to ensure all pieces fit together correctly.
- Pre-Drill Holes: Pre-drilling screw holes can prevent wood from splitting and ensure a cleaner assembly.
- Safety First: Always wear appropriate safety gear, such as goggles and gloves, and familiarize yourself with tool operation before starting.
Ideal Placements for Your Picnic Table
A well-placed picnic table can enhance various outdoor settings:
- Backyards: Provides a central spot for family meals, children’s activities, or relaxation.
- Gardens: Offers a serene place to enjoy nature, read, or entertain guests amidst greenery.
- Community Parks: Serves as a gathering point for social events, encouraging community interaction.
- Workplaces: Incorporating picnic tables in outdoor areas can create a relaxed environment for breaks and informal meetings.
By embarking on this DIY project, you’re not just building a piece of furniture; you’re creating a personalized space that reflects your style and meets your specific needs. Whether it’s for family gatherings, a quiet retreat, or community events, a handcrafted picnic table is a valuable addition to any outdoor area.
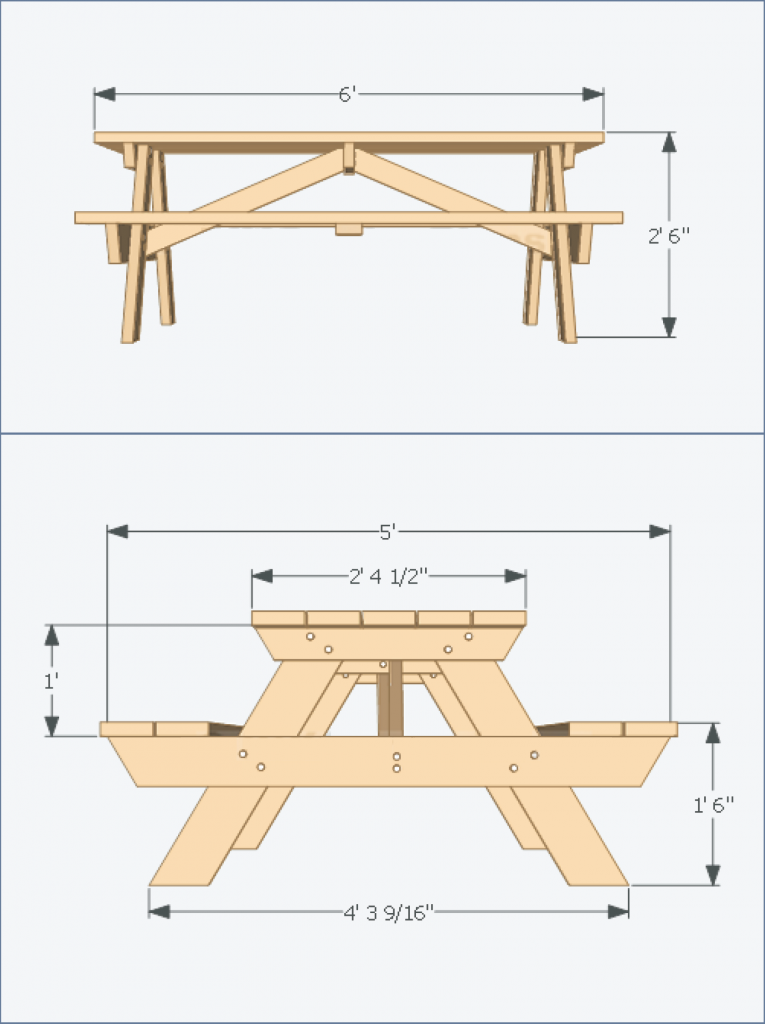
Dimensions
Material / Cut List
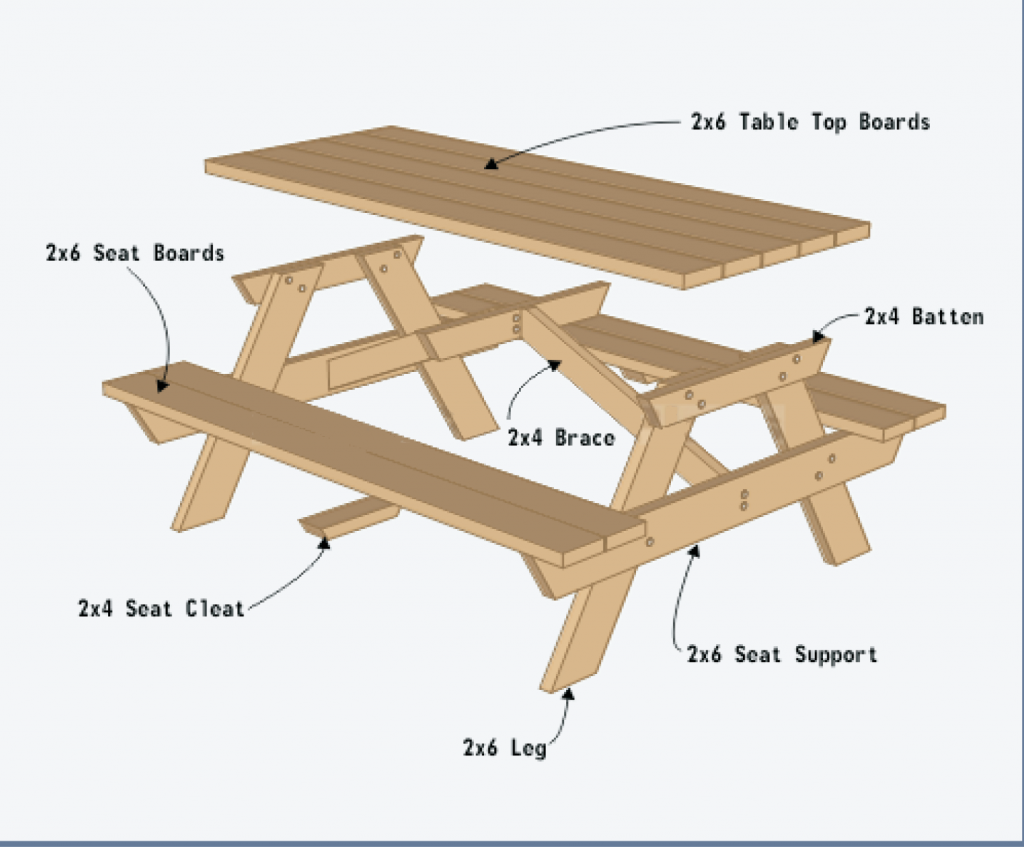
| Description | Quantity | Size |
|---|---|---|
| Table Top (2×6) | 5 | 6′ |
| Batten (2×4) | 3 | 2’4 1/2″ |
| Leg (2×6) | 4 | 3′ |
| Seat Support (2×6) | 2 | 5′ |
| Brace | 2 | 2’10 1/8″ |
| Seat (2×6) | 4 | 6′ |
| Cleat (2×4) | 2 | 11 1/4″ |
Material/Shopping List
Since lumber can be purchased in different sizes, the shopping list may vary. Review the cut list above and adjust as needed.
| Description | Quantity | Size |
| Table Top (2×6) | 2 | 12′ |
| Table Top (2×6) | 1 | 8′ |
| Batten (2×4) | 1 | 8′ |
| Leg (2×6) | 1 | 12′ |
| Seat Support (2×6) | 1 | 10′ |
| Seat (2×6) | 2 | 12′ |
| Brace, Cleat (2×4) | 1 | 8′ |
| Hardware | ||
| 3″ long 3/8″ diameter carriage bolt, nut, washer | 16 | |
| 2 1/2″ deck screws | – |
Step-by-Step Assembly Instructions
Step 1: Assemble the Tabletop
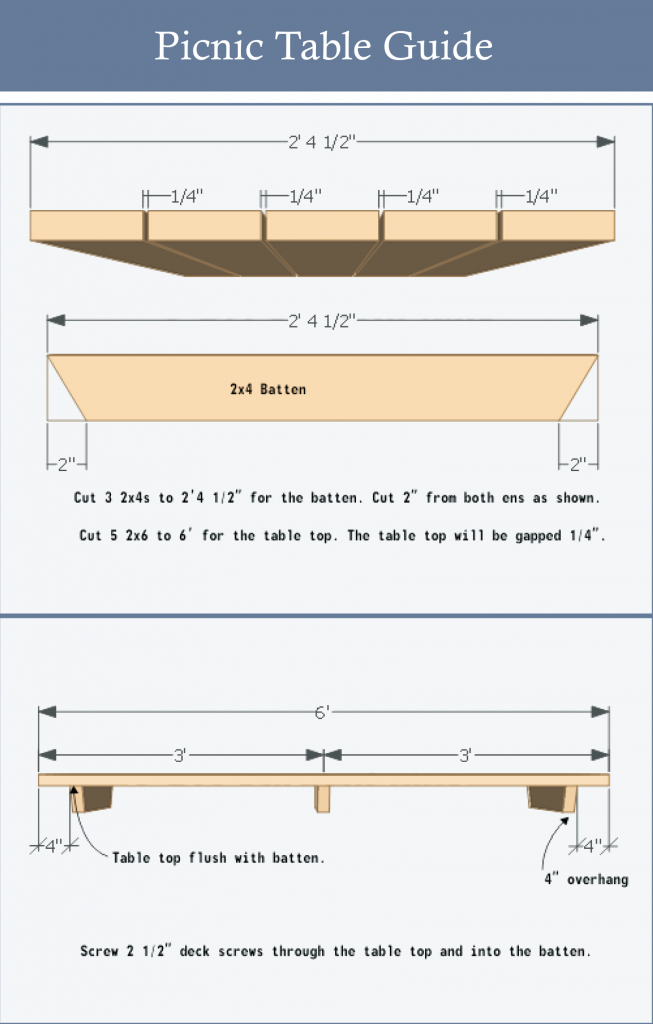
- Lay out the five 2×6 boards for the tabletop.
- Attach battens across the boards using 2 1/2″ deck screws.
- Ensure spacing is even between boards (important).
Step 2: Construct the Legs
- Cut four legs from 2×6 boards with 30 degree angles as shown above.
- Position legs at the very edge of the second tabletop board as shown above.
- Countersink 1 inch wide holes—1/2 inch deep—and attach using carriage bolts.
- Secure tightly with washers and nuts; the 1-inch-wide hole should be just enough for your washer to rest in.
Step 3: Add Seat Supports
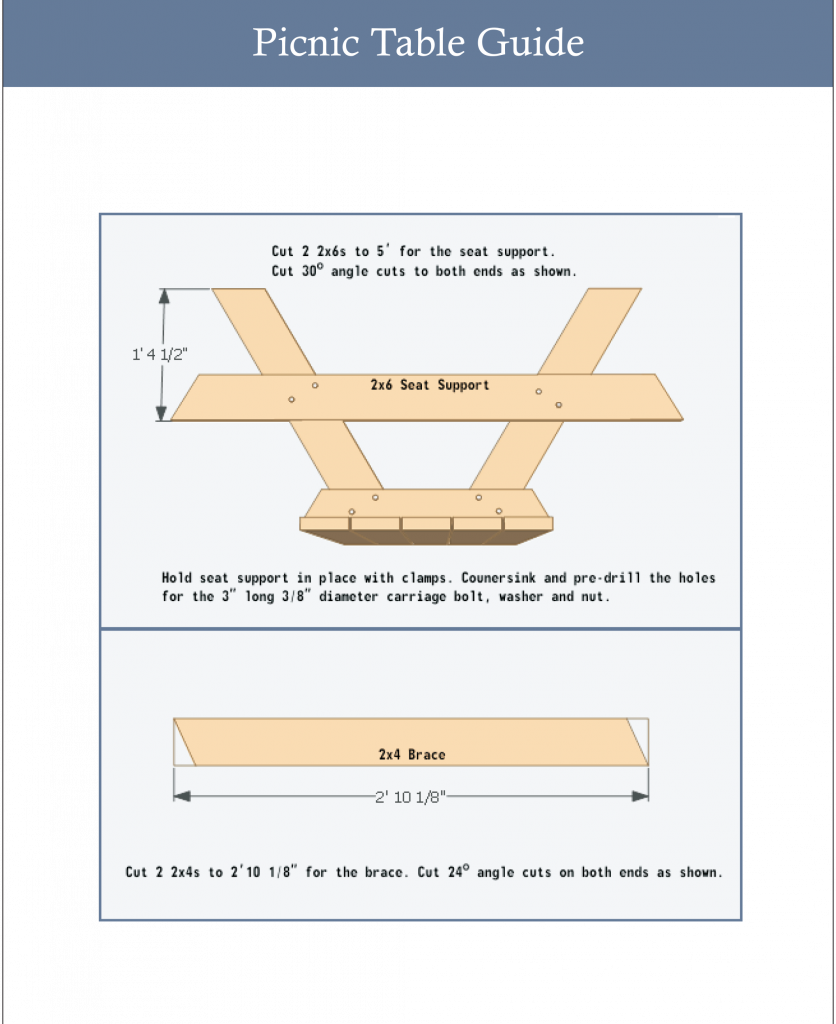
- Make sure supports are level before securing (see image above).
- Attach 2×6 seat supports to the legs using bolts after countersinking your holes.
Step 4: Install Braces
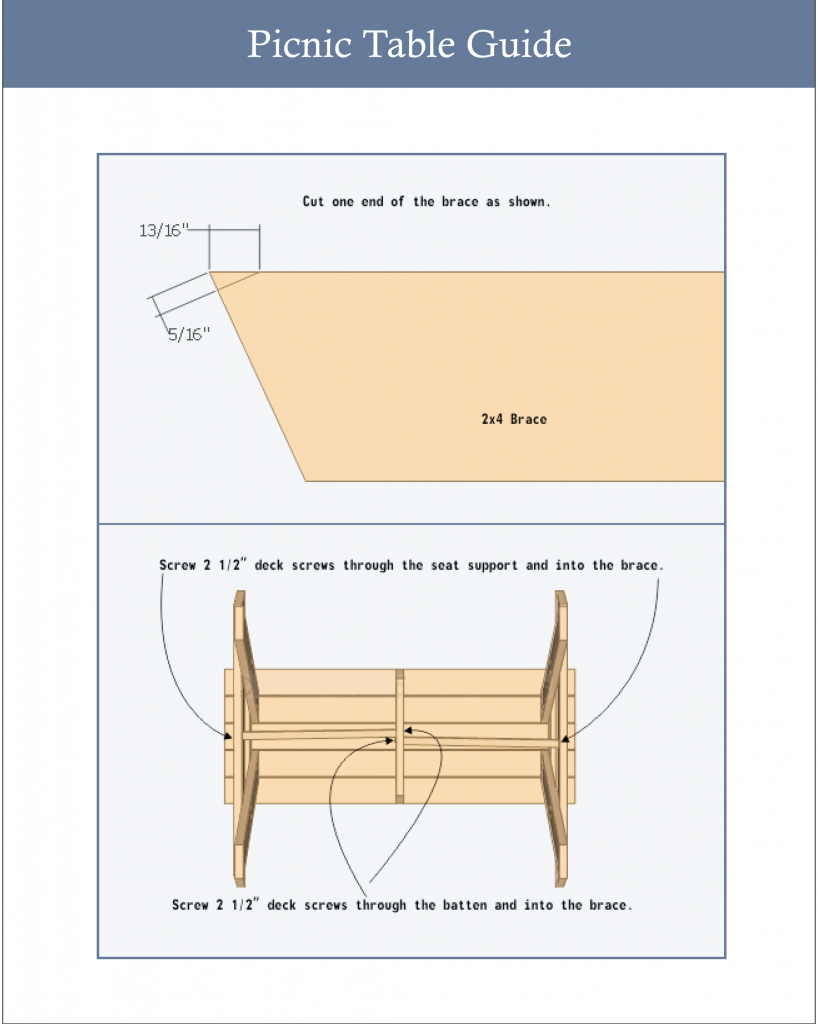
- Cut and install braces between the legs.
- cut one end as shown above; this allows the brace to rest flush on the underside of the tabletop, giving a better support
- Secure them with 2-1/2″ screws.
Step 5: Attach the Seats
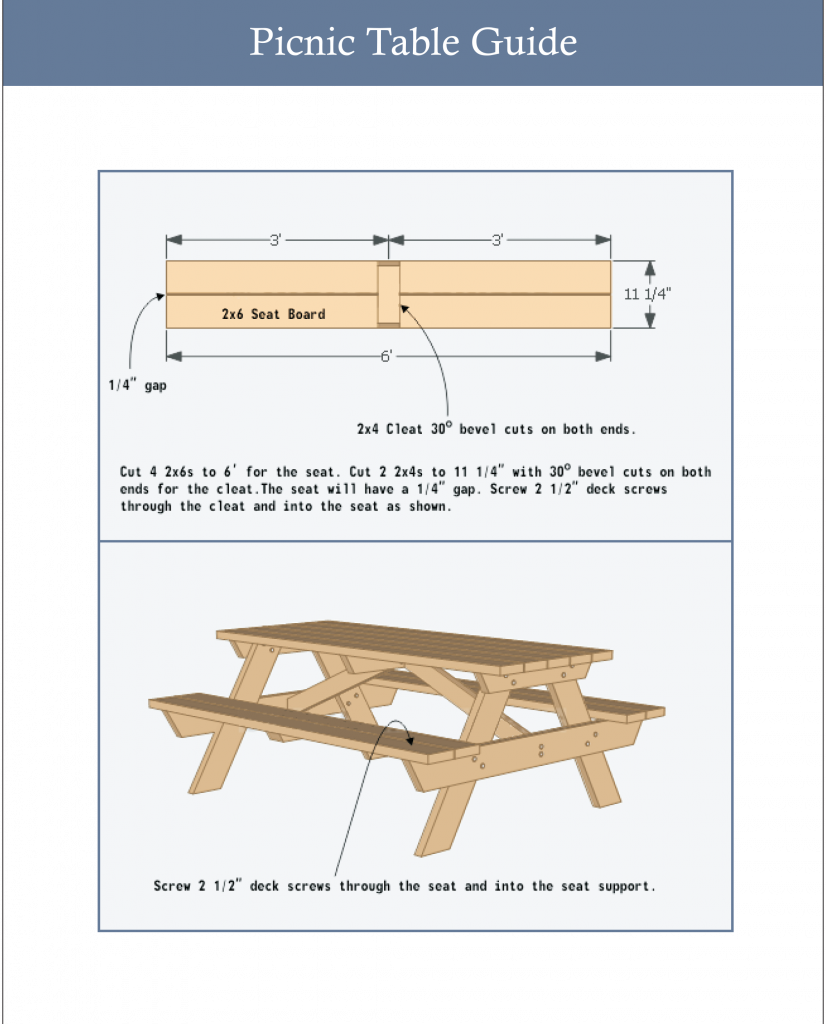
- Position seat boards on supports; be sure to check the distance between the table leg and the inner edge of the seat is even on both sides.
- Secure with deck screws, ensuring even spacing.
Step 6: Final Checks and Finishing Touches
- Sand any rough edges.
- Apply wood stain or weatherproofing if desired (highly recommended to paint first before assembly).